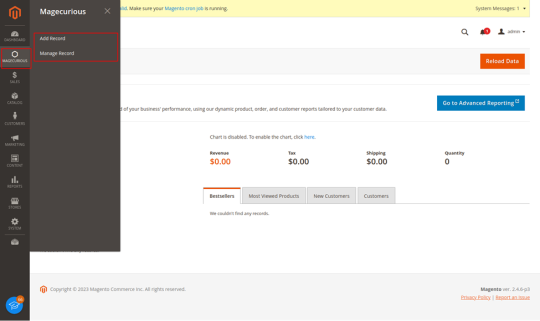
#create new admin menu
Explore tagged Tumblr posts
Visit Tumblr Blog
Explore Tumblr blogs with no restrictions, modern design and the best experience.
Last Seen Tumblr Blogs


Fun Fact
After the announcement of the deal with Yahoo!, there were 170K signatures of unhappy Tumblr users petitioning to prevent the sale in 2013.
Text
How to Add Custom Admin Menu in Magento 2
Hello Everyone,
In this blog, we will learn about how to Add Custom Admin Menu in Magento 2.
Magento gives a wide range of admin menu options although sometimes wants to add custom admin menu and submenu in the store admin sidebar.
Without wasting your time, let us guide you straight away. Follow the easy step given below to Add Custom Custom Admin Menu in Magento 2.
STEPS FOR ADD CUSTOM HEADER AND TOP LINK IN MAGENTO 2
Step 1: Create menu.xml file
app/code/Vendor/Extension/etc/adminhtml/menu.xml
<?xml version=”1.0″?>
<config xmlns:xsi=”http://www.w3.org/2001/XMLSchema-instance” xsi:noNamespaceSchemaLocation=”urn:magento:module:Magento_Backend:etc/menu.xsd”>
<menu>
<add id=”Vendor_Extension::magecurious” title=”Magecurious” module=”Vendor_Extension” sortOrder=”10″ resource=”Vendor_Extension::magecurious”/>
<add id=”Vendor_Extension::addrecord” title=”Add Record” module=”Vendor_Extension” sortOrder=”10″ action=”helloworld/index/index” resource=”Vendor_Extension::addrecord” parent=”Vendor_Extension::magecurious”/>
<add id=”Vendor_Extension::managerecord” title=”Manage Record” module=”Vendor_Extension” sortOrder=”10″ parent=”Vendor_Extension::magecurious” action=”helloworld/index/index” resource=”Vendor_Extension::managerecord”/>
</menu>
</config>
Step 2: Finally run the below commands
$ php bin/magento setup:upgrade
$ php bin/magento cache:clean
$ php bin/magento cache:flush
Final Thoughts:
So this was the easiest way which we have told you in this blog. This is how you can Add Custom Admin menu and submenu in Magento 2. Hope you liked the blog.
So quickly go to the comment box and tell me how you like this blog?
Stay tuned with us on our site to get new updates of Magento.
Thanks for reading and visiting our site.
0 notes
Text
Thursday, August 22nd, 2024
🌟 New
Posting in communities no longer counts towards your overall 250 posts/day limit (500 for those with Tumblr Premium), instead we’ve made posting in communities a new, separate 250 posts/day limit (also 500 for those with Tumblr Premium).
We’ve launched an option to make communities free to join and added a “Copy link” option to the community menu to make opening the floodgates even easier.
If you’re banned from a community, you’ll now see “You’ve been banned” instead of “There’s nothing here.”
In a community post’s meatballs menu, “Delete” has been replaced with “Moderate post,” where you can now select reasons for why you’re removing the post and add an optional note. At this moment, the removal reasons you provide won’t be visible to anyone yet. In the future, the person who posted the removed post into the community will see the removal reason as well as any included note.
On public communities, all users can now access the list of admins and moderators.
🛠 Fixed
For a short time Friday and Saturday last week, posts that were moderated in communities were still surfacing in the feed. We’ve fixed the issue, and moderated posts are now filtered out of the feed again.
We fixed a bug that was preventing communities from being deleted when the last member left, and we’ve cleaned up any communities that had no members. The names they were using are freed up for new communities.
We’ve made sure that community notifications are displayed properly, and with the proper icon, across all platforms.
We found an issue that briefly prevented Tumblr Premium users from fully creating communities. This has been fixed, and all affected communities have been fully created.
We fixed an issue that briefly removed the ability to backdate posts late last week.
🚧 Ongoing
No ongoing incidents to speak of right now.
🌱 Upcoming
No upcoming launches to announce today.
Experiencing an issue? Check for Known Issues and file a Support Request if you have something new. We’ll get back to you as soon as we can!
Want to share your feedback about something? Check out our Work in Progress blog and start a discussion with other users.
Wanna support Tumblr directly with some money? Check out Premium and the Supporter badge in TumblrMart!
234 notes
·
View notes
Text
ROBLOX: CORRUPT WORLDS AU
Edited: ???

woahhh look at me being a graphics designer hjehfjej
Even more stuff about this au in my Masterpost for it! Linked in underline.
TL;DR *proceeds to wall of text u*: “The gods” decided to split the universe into multiple pieces & planets because they refused to share. At some point soon after the split, the Roblox Nexus System (R.N.S), founded by Builderman, decided to make a way to jump between these worlds. And a way to make your own pocket-dimension worlds called Miniworlds (which you can code yourself)
Worldhopping is the name of the process for jumping between both Beeg Woelds and Small Worelds.
The Menu is a holographic thing they can will to appear by saying /menu, they can also say /leave to return to Nexus (the world between worlds) whenever they wish.
Miniworlds/Gameworlds are the names of the Pocket dimension worlds, they are either used for Entertainment/Games, or for storage. Sometimes even for Corporate purposes, or to live in (usually only rich people live in miniworlds tho)
Etc:
In present day the CEO of the R.N.S. is an artificial Robloxian named ROBLOX. Who makes sure the System and Worlds are stable.
A Robloxian can make a User I.D. to Worldhop at one of the Desks in Nexus. If they do not have an I.D., their Menu will not allow them to Worldhop using it.
Admins and Moderators exist to ensure the law is obeyed and the system is not exploited. They also investigate Anomalous Incidents.
Full Lore (With a side of extra rambling):
A long time ago, when their Universe was still New, Deities and Powerful Beings often fought over what parts of the Planet were theirs. Conflict over land stayed a problem for quite a while, before they decided to split the Universe into multiple “Worlds”. You could try to call them Pocket Dimensions, but it isn’t the most accurate, and is rarely done in to refer to these Residential Worlds…
In Modern-Day, a way was made by the ROBLOX Nexus System (R.N.S.) to jump between both Larger Worlds the gods supposedly made, and Smaller Worlds that Mortals used Magic, or Worldcode—the Code in every World that tells it how to function—to create. These smaller-worlds can be considered more alike to the description of a Pocket Dimension.
Users of this system are capable of opening a Holographic Menu, which allows them to legally use a specific few Worldcommands to leave and enter these Worlds! Though, entering using the Menu is a difficult thing to do unless you know the Username of a Miniworld.
Going between these “Miniworlds” or “Game Worlds”, is called Worldhopping. Even though they remain in the same Universe.
A Living-Beings code is called Biocode, while a World’s Code is called Worldcode. This is a bit like DNA, in a way, except there is some in inanimate objects too. Worldcode/Biocode determines the physical properties of an Object or Being, and a few non-physical ones. Without it, they would cease to physically exist, unless another source was their Lifeforce.
Homeworlds are Worlds Robloxian’s live in. Being whole Planets with their own Populations of Robloxian’s. They are also mainly where Companies build and stuff… There are two kinds of Homeworlds: Worldhopper Homeworlds (Also called Alt-Homeworlds), and Normal Homeworlds.
The population in Worldhopper Homeworlds knows of Worldhopping, and Normal Homeworlds keep Worldhopping a secret from the Population. (Why they would hide such a useful thing? who knowsss)
5 notes
·
View notes
Text
Astarion wallpaper
So, this one got me a little teary eyed but since he can never see his reflection, but in any case if I could put up even a cracked reflection of him. I would. PLEASE like and reblog if you use this :D and I will keep creating more!
Also check out our new menu on Ko Fi we will write literally anything for this sexy vampire.

Your reflection,
Admin Sav
#bg3#astarion#bg3 astarion#baldur's gate#baldurs gate 3#astarion smut#bg3 smut#astarion x you#astarion x reader#astarion fic#baldurs gate astarion#astarion baldur's gate 3#astarion romance#astarion x y/n#baldur's gate 3#baldur's gate iii#astarion fluff#astarion fanfic#neil newbon
87 notes
·
View notes
Note
hii how do I do a group account?
sorry for the late reply, here's a quick tutorial!
On web:

Create a new blog from the account menu
sideblogs are connected to your main account and do not require any logging out or password sharing, they just function as a new blog to post under. You can't like or follow from a sideblog, but you can reply and answer asks.
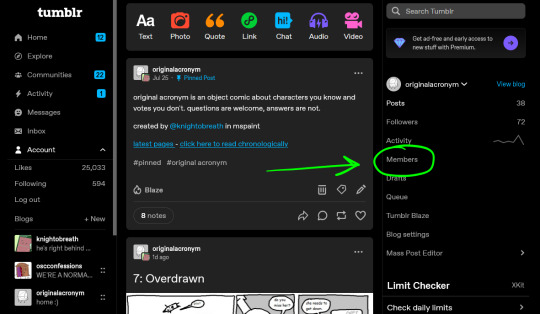
click "members"

From this screen you can add new members by typing their main blog's name into the "invite to this blog" box and hitting the button. it will automatically send an email to them, but it will also give you a link that you can dm them to add them.
this screenshot is from a blog im on with a lot of people:

when you add people, they will be added as a member and can make and reblog posts to the blog. You can promote them to admin, which will give them all the same permissions as you, the blog creator (this includes answering asks, editing the blog, and adding new members)
on app:


to make a new blog, you go to the blog menu from the top of your account tab. there will be an option at the bottom.
unfortunately, you cannot manage blog members from the app, and will have to use a browser to add and promote blog members.
7 notes
·
View notes
Text
How To Add Users in Ubuntu 24.04 LTS
Adding users is a fundamental responsibility of system administrators, crucial for maintaining secure access and efficient resource allocation. Regular users need accounts for their daily operations, and administrators require robust ways to manage these accounts seamlessly. Effective user addition ensures that each user has the appropriate access and permissions for their role.
How To Add Users in Ubuntu 24.04 LTS
Ubuntu 24.04 LTS offers diverse methods for adding users, accommodating various preferences and needs. Whether you prefer the precision of terminal commands, the convenience of a graphical interface, or the efficiency of automation scripts, this guide covers it all. In this comprehensive guide, we will explore multiple methods for adding users in Ubuntu 24.04 LTS, including:
Using the Command Line: Employing powerful commands like adduser and useradd for detailed and controlled user creation.
Using the Graphical User Interface (GUI): Managing user accounts through Ubuntu’s intuitive settings interface.
Adding Users Temporarily: Creating users with expiration dates for specific tasks.
Automating User Creation with Scripts: Streamlining bulk user creation with custom scripts.
Each method is detailed with step-by-step instructions to ensure you can add users effectively and effortlessly, enhancing your Ubuntu experience.
Method 1: Adding a User Using the Command Line
This method is ideal for administrators who prefer using terminal commands.
Using adduser
An easy-to-use, high-level command for adding users is the adduser. It provides a guided process to set up a new user, including setting a password and additional user information.
Step 1: Open the Terminal
To access the terminal, simultaneously depress the Ctrl, Alt, and T keys. Alternatively, search for "Terminal" in your application menu.
Step 2: Add a New User
Execute the following command:
sudo adduser newuser

Substitute newuser with your desired username.
The password must be entered when prompted.
Take Note:
Make sure the password satisfies the following requirements:
Minimum of 8 characters.
Includes both upper and lower case letters.
Contains at least one number.
Includes special characters (e.g., !, @, #, $, etc.).

Enter the password and press Enter.
Type the password one more time and hit Enter to confirm it.
Some details will be asked while adding a new user like full name, room number, work phone, and home phone.

Any field can be skipped by pressing Enter.
After entering the information, you will see a summary of the details.

Confirm the details by typing Y and pressing Enter.
Step 3: Verify User Creation
Execute the below given command to check the new user's addition:
getent passwd newuser
If the command is successful in creating the user, the user's details will be shown like this:

Using useradd
A low-level utility for creating new users is the useradd command. It requires more specific options but offers greater control over the user creation process.
Step 1: Open the Terminal
The terminal can be opened by simultaneously holding down the Ctrl, Alt, and T keys.
Step 2: Add a New User
Run the following command, and substitute new_username with the username you prefer:
sudo useradd -m new_username
Making sure the user's home directory is created is ensured by the -m option.
Step 3: Set Password for the User
The new user can be assigned a password by using:
sudo passwd new_username

Type the password one more time and hit Enter to confirm it.
Step 4: Verify User Creation
Execute the below given command to check the new user's addition:
getent passwd new_username
If the command is successful in creating the user, the user's details will be shown.

Additional Steps (Optional)
Adding the User to a Specific Group
Use the below given command to add a new user to a certain group:
sudo usermod -aG groupname newuser
Replace groupname with the desired group (e.g., sudo, admin, docker).
Execute the below given command to check the new user's addition:
groups new_username
This command will list all the groups that the user belongs to, including the new group.

Method 2: Adding a User Using GUI (Graphical User Interface)
For those who prefer a graphical interface, Ubuntu provides an easy way to manage users through its settings. Here's a step-by-step guide to adding a new user using the GUI.
Step 1: Open Settings
To access the terminal:
Search for "Settings" in your application menu.

Step 2: Access Users Section
In the Settings window, go to the search bar at the top and type "Users."

As an alternative, move to the sidebar's bottom and select "System."

Click on "Users" from the options available in the System settings.
Step 3: Unlock User Management
Select the "Unlock" button by moving to the upper right corner.

Enter your administrative password and click "Authenticate."
Step 4: Add New User
Click the "Add User" button.
Input the required data, including your username and name.
You can choose to keep the toggle button inactive by default to designate the new user as a "Standard" user.
Then insert password.
Step 5: Confirm and Apply
Click "Add" to create the user.
Now the new user will appear in the user list.
Take Note
User Management:
Once the user is created, click on the username in the Users section to manage its settings.
Method 3: Adding a User Temporarily
For certain tasks, you might need to add a user that expires after a specified period. This method outlines how to create a user with an expiration date using the command line.
Step 1: Open the Terminal
The terminal can be opened by simultaneously holding down the Ctrl, Alt, and T keys.
Step 2: Add a User with an Expiry Date
Execute the following command:
sudo useradd -m -e YYYY-MM-DD temporaryuser
Replace YYYY-MM-DD with the desired expiration date and temporaryuser with your desired username.
Step 3: Set Password for the User
The new user can be assigned a password by using:
sudo passwd temporaryuser
Enter the password, when prompted.
Type the password and press Enter.
Type the password one more time and hit Enter to confirm it.
Step 4: Verify User
To verify that a temporary user has been created successfully, use the below given command:
sudo chage -l temporaryUser
Substitute the temporaryuser with the username you want to verify.
Method 4: Automating User Creation with Scripts
The method outlined here demonstrates automating user creation with scripts, particularly useful for bulk user creation tasks.
Step 1: Open the Terminal
The terminal can be opened by simultaneously holding down the Ctrl, Alt, and T keys.
Step 2: Create a Script
Any text editor will work for writing the script. Using nano, for instance:
nano add_users.sh
Step 3: Add Script Content
Add the following content to the script. Modify the usernames and other details as needed.
#!/bin/bash
sudo adduser user1 --gecos "First Last,RoomNumber,WorkPhone,HomePhone" --disabled-password
echo "user1:password1" | sudo chpasswd
sudo adduser user2 --gecos "First Last,RoomNumber,WorkPhone,HomePhone" --disabled-password
echo "user2:password2" | sudo chpasswd
Replace user1, user2, etc., with the desired usernames.
Modify the --gecos option to provide additional information about the user (optional).
Replace the password with the desired password.
Adjust the script content as needed, adding more users or customizing user details.
Save and close the file.
Step 4: Make the Script Executable
To enable the script to run, use the chmod command.
chmod +x add_users.sh

Step 5: Run the Script
Run the script to create the users.
./add_users.sh

Conclusion:
User management in Ubuntu 24.04 LTS is a critical task for system administrators, providing security, efficient resource allocation, and smooth system operation. With various methods available, from command-line interfaces to graphical user interfaces and automation scripts, Ubuntu 24.04 LTS ensures that adding users can be tailored to different needs and preferences. By following the comprehensive steps outlined in this guide, you can effectively manage regular users.
2 notes
·
View notes
Text
How to Show Featured Images in Your WordPress Posts [Step-by-Step]

A featured image is a key element in making your WordPress posts visually appealing and engaging. Here’s a detailed guide on how to display featured images effectively.
Understanding the Importance of Featured Images
A featured image is the primary visual for your post, often shown on the homepage and social media. It sets the tone and context for your content.
Steps to Display a Featured Image
Access Your WordPress Admin: Log into your WordPress dashboard.
Create or Edit a Post: Select "Posts" from the left menu and choose "Add New" or an existing post to edit.
Find the Featured Image Section: Look for the "Featured Image" box on the right sidebar.
Add Your Image:
Click on “Set featured image.”
Choose from the media library or upload a new image.
Click “Set featured image” to confirm your choice.
Update Your Post: Ensure you publish or update to reflect the changes.
Best Practices for Featured Images
Select Quality Images: High-resolution images will capture more attention.
Optimize for Performance: Use image compression tools to keep your site fast.
Know Your Theme’s Specs: Different themes require different image sizes.
Common Issues and Solutions
If your featured image isn’t displaying:
Check Your Theme Settings: Make sure it supports featured images.
Look for Plugin Conflicts: Disable plugins to find any issues.
Clear Your Browser Cache: Sometimes changes won’t show until the cache is cleared.
Conclusion
Utilizing featured images effectively can enhance your posts and engage your audience. Should you need to hide a featured image for specific posts, explore How to Hide Featured Image in WordPress Post. Implementing these tips will elevate your blog’s visual presence!
4 notes
·
View notes
Text

EVENT 017 ~ CHRISTMAS IN AURORA BAY ~ DECEMBER 1ST - DECEMBER 27TH
It's the most wonderful time of year in Aurora Bay once again! Over the last few weeks residents will have noticed decorations beginning all around town, from garlands in the shops and lights in the gardens, and of course the fifty foot tree in the center of town square! With new activities this year like carriage rides through the lights and a town-wide Secret Santa present exchange, this year is going to be bigger and better than ever before!
And don't think we forgot about New Years Eve! More info will come later in the month!
OOC INFO BELOW:
Once again Aurora Bay is holding its annual Christmas event! This event will include decorations, parades, Christmas plays, and so much more!
Neighborhoods:
Just like the Halloween event, you may post photos of your character's houses, apartments, and dorms decorated for the holidays!
Aurora Bay's Market Place:
The market place is around all year, but this time of year it is one of the best places in town for purchase decorations for your own homes or gifts for family and friends! Decked out in dozens of pop-up shops, food vendors, snow machines, and holiday music all around, the market place has been transformed into a true winter wonderland!
Botanical Gardens:
The botanical gardens will be decked out in beautiful Christmas lights! This is where you'll find the Christmas tree market to take your very own tree home, as well as horse-drawn carriage rides! New this year, Seahorse Ranch will have some of their horses available for evening carriage rides that take you throughout the gardens and into the town square to see all the lights! Tickets to enter the gardens will be 15 dollars per adult and 7 dollars per child, any kids under 5 get in for free! 50% of proceeds will be donated to various charities such as, Seaside Animal Rescue and Aquatica marine life rehabilitation center. Seaside Animal Rescue has been the number one place for those in Aurora Bay to adopt cats and dogs to find their forever homes! This rescue has done so much to ensure these animals get off the streets, become healthy, and find their homes! Aquatica is a rehabilitation center for marine life in Aurora Bay. Most of these creatures that reside there were injured or sick, and once they're healed they return to the ocean. However, some of the marine life, even after treatments, have not been fit to return to the sea, therefore they've become longtime residents of the aquarium!
Aurora Bay's Firehouse:
The firefighters at the firehouse will be hosting Toys for Tots toy drive for children in hospitals and shelters in California! There will be boxes for item collections open throughout the first two weeks of December so there will be plenty of time to get the gifts ready before Christmas Day!
Charles Levin Community Theatre:
The community theatre in town will be putting on it's holiday production of A Christmas Carol this year! More details will come for this, but there will be a list of roles in the play that you may volunteer your character to play in the production!
Town Square:
Join us December 1st for the lighting ceremony of the large Christmas tree in the middle of town! The tree will be lit during sunset for the entire month and during the day, don't forget to come and get your little ones' their photos with Santa! Aurora Bay's annual Christmas parade will also make its route through town on Saturday the 21st! Any businesses that want to have a float or any characters wanting to participate can let us know by dm'ing us on the main! Business owners can come up with their own ideas for themes, just let us admins know so we can approve and make a list of floats and volunteers!
Restaurants:
Most restaurants will have their own winter menus, including fun holiday drinks and food items! Any establishment owners can feel free to create posts with holiday menus and tag the aesthetic blog!
Aurora Bay Public Library:
Oceania Bookstore and the Aurora Bay Library will be teaming up to host holiday story time in the library every Friday thru Sunday at 11am and 3pm! Oceania and the Library will also be donating some of their best children holiday books to Aurora Bay's hospital's children's wing. Anyone wanting to come by and donate their own books are greatly encourage to do so!
Secret Santa:
Hosted by Town Hall, we'll be pairing up random muses to be each others’ secret Santas! The gifts exchanged can be made into a post, or threads done between the muses! If you'd like for your character to be involved for Secret Santa, send us a dm on the main with your character(s) and a little fact about them to help with gifts! The deadline to send in your characters for Secret Santa is Sunday December 15th. We will then be messaging everyone their pairings on Tuesday! Gift exchanges can then be posted any time after pairings are given through the end of the month.
Example for a character submission:
Emerson Cassidy: books, teas, candles, doesn't really drink
ADDITIONAL INFO:
Once again this is a month-long event! We encourage our players to go ahead and use the above for new threads and to use your imagination for the holiday season activities found all throughout town!
There will be a part two to the event for the end of the year and we'll be making a post for it later in December!
For any open starters (or any aesthetic posts!) please use the tag ab.christmas!
The first 6 open starters may be posted without replying to others first, but after those first 6 are posted, please reply to at least 2 open starters before posting your own!
2 notes
·
View notes
Text
#Playstation7 #framework #BasicArchitecture #RawCode #RawScript #Opensource #DigitalConsole
To build a new gaming console’s digital framework from the ground up, you would need to integrate several programming languages and technologies to manage different aspects of the system. Below is an outline of the code and language choices required for various parts of the framework, focusing on languages like C++, Python, JavaScript, CSS, MySQL, and Perl for different functionalities.
1. System Architecture Design (Low-level)
• Language: C/C++, Assembly
• Purpose: To program the low-level system components such as CPU, GPU, and memory management.
• Example Code (C++) – Low-Level Hardware Interaction:
#include <iostream>
int main() {
// Initialize hardware (simplified example)
std::cout << "Initializing CPU...\n";
// Set up memory management
std::cout << "Allocating memory for GPU...\n";
// Example: Allocating memory for gaming graphics
int* graphicsMemory = new int[1024]; // Allocate 1KB for demo purposes
std::cout << "Memory allocated for GPU graphics rendering.\n";
// Simulate starting the game engine
std::cout << "Starting game engine...\n";
delete[] graphicsMemory; // Clean up
return 0;
}
2. Operating System Development
• Languages: C, C++, Python (for utilities)
• Purpose: Developing the kernel and OS for hardware abstraction and user-space processes.
• Kernel Code Example (C) – Implementing a simple syscall:
#include <stdio.h>
#include <unistd.h>
int main() {
// Example of invoking a custom system call
syscall(0); // System call 0 - usually reserved for read in UNIX-like systems
printf("System call executed\n");
return 0;
}
3. Software Development Kit (SDK)
• Languages: C++, Python (for tooling), Vulkan or DirectX (for graphics APIs)
• Purpose: Provide libraries and tools for developers to create games.
• Example SDK Code (Vulkan API with C++):
#include <vulkan/vulkan.h>
VkInstance instance;
void initVulkan() {
VkApplicationInfo appInfo = {};
appInfo.sType = VK_STRUCTURE_TYPE_APPLICATION_INFO;
appInfo.pApplicationName = "GameApp";
appInfo.applicationVersion = VK_MAKE_VERSION(1, 0, 0);
appInfo.pEngineName = "GameEngine";
appInfo.engineVersion = VK_MAKE_VERSION(1, 0, 0);
appInfo.apiVersion = VK_API_VERSION_1_0;
VkInstanceCreateInfo createInfo = {};
createInfo.sType = VK_STRUCTURE_TYPE_INSTANCE_CREATE_INFO;
createInfo.pApplicationInfo = &appInfo;
vkCreateInstance(&createInfo, nullptr, &instance);
std::cout << "Vulkan SDK Initialized\n";
}
4. User Interface (UI) Development
• Languages: JavaScript, HTML, CSS (for UI), Python (backend)
• Purpose: Front-end interface design for the user experience and dashboard.
• Example UI Code (HTML/CSS/JavaScript):
<!DOCTYPE html>
<html>
<head>
<title>Console Dashboard</title>
<style>
body { font-family: Arial, sans-serif; background-color: #282c34; color: white; }
.menu { display: flex; justify-content: center; margin-top: 50px; }
.menu button { padding: 15px 30px; margin: 10px; background-color: #61dafb; border: none; cursor: pointer; }
</style>
</head>
<body>
<div class="menu">
<button onclick="startGame()">Start Game</button>
<button onclick="openStore()">Store</button>
</div>
<script>
function startGame() {
alert("Starting Game...");
}
function openStore() {
alert("Opening Store...");
}
</script>
</body>
</html>
5. Digital Store Integration
• Languages: Python (backend), MySQL (database), JavaScript (frontend)
• Purpose: A backend system for purchasing and managing digital game licenses.
• Example Backend Code (Python with MySQL):
import mysql.connector
def connect_db():
db = mysql.connector.connect(
host="localhost",
user="admin",
password="password",
database="game_store"
)
return db
def fetch_games():
db = connect_db()
cursor = db.cursor()
cursor.execute("SELECT * FROM games")
games = cursor.fetchall()
for game in games:
print(f"Game ID: {game[0]}, Name: {game[1]}, Price: {game[2]}")
db.close()
fetch_games()
6. Security Framework Implementation
• Languages: C++, Python, Perl (for system scripts)
• Purpose: Ensure data integrity, authentication, and encryption.
• Example Code (Python – Encrypting User Data):
from cryptography.fernet import Fernet
# Generate a key for encryption
key = Fernet.generate_key()
cipher_suite = Fernet(key)
# Encrypt sensitive user information (e.g., account password)
password = b"SuperSecretPassword"
encrypted_password = cipher_suite.encrypt(password)
print(f"Encrypted Password: {encrypted_password}")
# Decrypting the password
decrypted_password = cipher_suite.decrypt(encrypted_password)
print(f"Decrypted Password: {decrypted_password}")
7. Testing and Quality Assurance
• Languages: Python (for automated tests), Jest (for JavaScript testing)
• Purpose: Unit testing, integration testing, and debugging.
• Example Unit Test (Python using unittest):
import unittest
def add(a, b):
return a + b
class TestGameFramework(unittest.TestCase):
def test_add(self):
self.assertEqual(add(10, 20), 30)
if __name__ == '__main__':
unittest.main()
8. Order of Implementation
• Phase 1: Focus on core system architecture (low-level C/C++) and OS development.
• Phase 2: Develop SDK and start building the basic framework for UI and input management.
• Phase 3: Work on backend systems like the digital store and integrate with front-end UI.
• Phase 4: Begin rigorous testing and debugging using automated test suites.
This comprehensive approach gives you a detailed idea of how each component can be built using a combination of these languages and technologies. Each section is modular, allowing teams to work on different aspects of the console simultaneously.
[Pixel Art/Sprites/Buildinodels/VictoriaSecretPixelArtKit #Playstation7 #DearDearestBrands]


#victoriasecretrunway#runwaybattle#victoria secret fashion#victoria secert model#victoriasecret#victoria secret#VictoriaSecretRunwayBattle#capcom victoriasecret#capcom videogames#playstation7#ps7#deardearestbrands#capcom#digitalconsole#python#script#rawscript#raw code#framework#VictoriaSecretVideoGame#deardearestbrandswordpress
2 notes
·
View notes
Text
Why I Believe a Multi-Vendor Food Ordering System Is a Game-Changer for Food Businesses
Hey there,
If you're anything like me—someone passionate about digital transformation and always looking for scalable ways to grow a business—then you’ll understand why I’m so excited about the potential of a Multi-Vendor Food Ordering System. I've been working closely with food tech innovations for a while now, and I can confidently say: DeliveryBee Apps is redefining how we think about online food delivery.

Why Go Multi-Vendor?
Imagine having a single platform where multiple restaurants can showcase their menus, accept orders, manage deliveries, and communicate with customers—all in one place. That’s exactly what a Multi Restaurant Food Delivery Solution brings to the table. It’s not just about convenience; it’s about building a scalable ecosystem where restaurants, delivery partners, and customers thrive together.
I’ve seen businesses struggle with managing individual apps or platforms for each vendor, and let me tell you—it’s inefficient, expensive, and outdated. With a Multi Restaurant Aggregator App, you create a centralized experience that boosts visibility for all vendors while making it easier for users to find and order what they need, fast.
What Makes DeliveryBee Apps Stand Out
When I explored DeliveryBee’s Multi Restaurant Online Food Delivery App, I was seriously impressed. It’s not just the sleek interface (although that helps); it’s the robust backend and intuitive features that make scaling a breeze. From real-time order tracking to smart analytics and seamless payment integration, the platform is built with enterprise needs in mind.
What really won me over is the flexibility. Whether you’re managing 10 restaurants or 10,000, the system adapts without compromising speed or user experience. That’s the kind of infrastructure I want powering my food delivery business.
Benefits I Couldn’t Ignore
Here’s what really makes a Multi Vendor Food Ordering System worthwhile for any enterprise:
Centralized Management: Control everything from one admin panel. Simple and efficient.
Brand Growth: More vendors mean more choices, and more choices mean happier customers.
Faster Onboarding: New restaurants can join the platform with minimal friction.
Customer Loyalty: With user-friendly features like loyalty points, push notifications, and real-time tracking, customer retention improves drastically.
Final Thoughts
If you're running a food business and want to scale fast without the usual tech headaches, I strongly recommend checking out DeliveryBee’s Multi Restaurant Food Delivery Solution. It’s a complete package—powerful, flexible, and designed for growth.
From one business enthusiast to another, investing in a Multi Restaurant Aggregator App could be one of the smartest moves you make this year. Trust me, I’ve seen the results—and they speak for themselves.
#Multi vendor food ordering system#Multi Restaurant Online Food Delivery App#Multi Restaurant Food Delivery Solution#Multi Restaurant Aggregator App
0 notes
Text

NFT Marketplace Development Roadmap: Complete Guide to Building Your NFT Platform
Introduction
NFT Marketplace development company expertise makes all the difference when you’re ready to launch your own digital asset hub. In this guide, we’ll unpack what an NFT marketplace is, why it matters, the key features to include, a step-by-step build plan, budget tips, and how Justtry Technologies can help you succeed.
What Is an NFT Marketplace?
An NFT marketplace serves as a digital hub where creators and collectors can produce, purchase, list, and exchange one-of-a-kind tokens of digital items that capture everything from artwork and music to collectibles and virtual property. Unlike conventional marketplaces, NFTs use blockchain technology to ensure verified ownership and authenticity of each digital asset. In simple terms, it’s like an art gallery on the internet, but with smart contracts handling every transaction.
Why NFT Marketplaces Matter
NFT marketplaces give creators direct access to global audiences, eliminating the need for middlemen and offering full control over their work. They empower artists to earn royalties automatically and let collectors verify provenance with ease. For businesses, entering this space taps into a vibrant community and new revenue streams. As more brands embrace digital collectibles, having a reliable nft marketplace development service behind you ensures you stay ahead of the curve.
Key Features Your NFT Platform Needs
To create a standout NFT marketplace, you need more than just minting and trading capabilities. A well-rounded platform combines seamless usability, rock-solid security, and powerful customization to meet both creator and collector needs. Below are the essential features that will help your marketplace thrive:
Intuitive Design: Simple menus, quick loading, mobile-ready.
Wallet Support: MetaMask, WalletConnect, Trust Wallet, and more.
Multi-Chain Options: Ethereum, Polygon, Binance Smart Chain.
Advanced Search: Filters by category, price, trending, and rarity.
Secure Transactions: Gas fee optimization, two-factor login, escrow contracts.
Royalties Dashboard: Automated payouts and clear analytics.
White-Label Flexibility: Offer a white label nft marketplace for brands to launch under their own name.
Community & Social Features: Enable comments, likes, and easy sharing to build engagement.
Analytics & Reporting: Provide creators and admins with in-depth insights on sales and user behavior.
Customer Support Hub: Real-time chat, a searchable FAQ, and ticket tracking to help users feel supported.
Including these features will set you apart as an nft development solutions leader.
Step-by-Step Development Roadmap
Building an NFT marketplace is a big undertaking, but breaking it down into clear phases makes the journey manageable and predictable. This roadmap walks you through every step from the very first strategy session to ongoing improvements after launch.
Discovery & Strategy Identify your target market, understand your audience’s needs, and set clear business objectives.
Design & Prototyping Build wireframes and mockups; validate with real users.
Smart Contract Coding Design, rigorously test, and thoroughly audit the smart contracts that power your minting processes, auction mechanics, and royalty distributions.
Frontend & Backend Build Use React or Angular for UI and Node.js or Django for server logic.
Integration & Testing Connect wallets, payment gateways, and run security checks.
Launch & Deployment Launch on the mainnet, set up your domain, and make the platform publicly accessible.
Maintenance & Growth Monitor performance, add new features, and support your community.
By following this structured approach, you’ll embody the best practices of any top nft development company and set your platform up for long-term success.
Tools & Technologies to Use
Blockchain Networks: Ethereum, Binance Smart Chain, Polygon
Development Frameworks: Hardhat, Truffle, Brownie
Frontend Libraries: React.js, Vue.js, or Angular
Storage Solutions: IPFS, Pinata, or Filecoin for metadata
APIs & SDKs: Use platforms like Alchemy, Infura, and Moralis to seamlessly connect with blockchain nodes and manage network interactions.
Security Audits: OpenZeppelin, CertiK, or PeckShield
DevOps & Hosting: AWS, Azure, or Google Cloud
These technologies ensure your platform remains scalable, secure, and user-friendly, reflecting best practices from leading nft marketplace development service providers.
How Justtry Technologies Can Help
When you partner with Justtry Technologies, you’re choosing an experienced nft development company that specializes in white label nft marketplace development and bespoke nft marketplace development service offerings. Our team will:
Work closely on ideas and design to create a platform that reflects your brand’s identity and vision.
Develop and audit smart contracts for secure transactions.
Build a responsive frontend and scalable backend.
Integrate multi-chain support and user analytics.
Provide ongoing maintenance, feature upgrades, and dedicated support.
Partnering with Justtry Technologies turns your NFT marketplace launch into a seamless and well-supported experience.
Conclusion
Building a successful NFT marketplace doesn’t have to be overwhelming. By following this roadmap from understanding core concepts and must-have features to selecting the right tools and managing your budget, you’ll be well on your way. As you set out, remember that choosing the right NFT Marketplace development company can make all the difference. Ready to turn your vision into reality? Let’s get started!
#nft marketplace development service#white label nft marketplace development#nft development solutions#white label nft marketplace#nft development company
0 notes
Text
FoodTiger Nulled Script 3.6.0

Unlock the Power of FoodTiger Nulled Script for Your Food Delivery Business Are you ready to revolutionize your food delivery startup with a robust and feature-rich platform? Look no further than the FoodTiger Nulled Script—a powerful solution designed to streamline operations, support multiple restaurants, and deliver exceptional user experience. This script is perfect for entrepreneurs and developers looking for a fast, reliable, and customizable tool to kick-start their food ordering service without the hefty price tag. What is FoodTiger Nulled Script? The FoodTiger Nulled Script is a premium food delivery software that has been unlocked for free access. Originally developed as a high-end solution for managing food delivery businesses, this nulled version offers you all the premium features—without any restrictions. With its intuitive interface and powerful admin dashboard, you can manage restaurants, orders, and customers with ease. It’s an excellent alternative for startups looking to save money while still accessing top-tier software. Technical Specifications Platform: Laravel PHP Framework Database: MySQL Languages: Fully multilingual with built-in translation support Responsive: 100% mobile-friendly layout Third-Party Integration: Supports Stripe, PayPal, and more Outstanding Features & Benefits Multi-Restaurant System: Perfect for marketplaces—host multiple restaurants under one roof. Real-Time Order Tracking: Let your users track their orders from kitchen to doorstep. Advanced Admin Panel: Manage restaurants, menus, discounts, and delivery zones effortlessly. Modern UI/UX: Sleek and intuitive design that enhances customer satisfaction. Contactless Delivery: Built-in support for safe, contactless food delivery methods. Why Choose FoodTiger Nulled Script? Choosing the FoodTiger gives you access to premium tools without licensing fees. You get the flexibility to customize every part of the system, from UI layouts to backend logic. It’s ideal for freelancers, startups, and developers who want full control over their food delivery platforms. Say goodbye to limitations and hello to a world of possibilities—all without spending a dime. Common Use Cases Launching a multi-vendor food delivery app in your local area Building a white-label solution for restaurant chains Starting a commission-based food ordering marketplace Testing new delivery models and logistics solutions with zero upfront cost How to Install FoodTiger Nulled Script Download the FoodTiger Nulled Script from our website. Upload the files to your server using FTP or cPanel. Set file permissions and create a new MySQL database. Run the installer by accessing your domain in a web browser. Follow the setup wizard and enter your database credentials. Login to the admin panel and start configuring your platform. Frequently Asked Questions (FAQs) Is it legal to use the FoodTiger Nulled Script? While using nulled scripts may violate the original developer’s terms, many users opt for them to test or build proof-of-concept platforms. We encourage using it responsibly and considering licensing options if you plan to scale. Can I customize the FoodTiger Nulled Script? Absolutely. The script is fully open-source and built on Laravel, allowing deep customization of features, design, and functionalities. Is this version secure for live deployments? The FoodTiger Nulled Script includes the same core security features as the licensed version. However, always perform your own audits and use secure hosting practices for best results. Where can I download the FoodTiger Nulled Script? You can download the latest version directly from our website and get started today with no hidden costs or restrictions. Start Building Your Delivery Empire Today Whether you’re a developer building a food delivery app or an entrepreneur aiming to create the next big thing in local delivery services, the FoodTiger is your gateway to fast, affordable, and scalable success. Don’t miss the opportunity to harness this powerful tool for free.
Check out our other valuable downloads like betheme nulled and explore even more resources to enhance your web projects. Need additional themes and scripts? Visit our trusted partner for more tools like betheme nulled to power up your development journey.
0 notes
Text
How Can a Meal Delivery App Boost Your Food Business Revenue in 2025?

In 2025, the demand for meal delivery is skyrocketing across the UK and USA, fueled by busy lifestyles, health-conscious consumers, and the convenience of tech-driven ordering. If you're in the food business—whether a restaurant owner, tiffin service provider, or cloud kitchen operator—now is the time to digitize. But how exactly can a meal delivery app help you grow? Let's dive into the benefits, features, market insights, and steps to build a successful meal delivery app.
Did You Know?
The global online food delivery market is projected to reach $505.5 billion by 2030.
In the UK, over 40% of consumers order food online at least once a week.
The US meal delivery market grew by 17% year-over-year in 2024.
These numbers indicate a thriving market—and an untapped opportunity for food businesses to expand with digital ordering solutions.
1. Why Your Food Business Needs a Meal Delivery App
Ask yourself:
Are you losing orders to competitors on UberEats or DoorDash?
Do you want to avoid hefty commissions from third-party platforms?
Want to streamline kitchen-to-customer flow?
If the answer is yes, it's time to consider a custom solution. A dedicated app lets you manage your brand, customer data, and delivery processes—all in one place.
Key Benefits:
Increased Orders: Make ordering easier for customers via mobile.
Better Customer Experience: Real-time updates, multiple payment options, and intuitive design.
Higher Profits: Avoid third-party fees and take control of your pricing.
Brand Loyalty: Engage users with deals, push notifications, and meal subscriptions.
2. Real-World Use Cases: Who Can Benefit?
A meal delivery app isn't just for large restaurant chains. Here's who else can gain:
Tiffin Services: Create a tiffin service app to automate daily meal deliveries.
Home-Based Chefs: Launch your brand with a food marketplace app.
Cloud Kitchens: Manage multiple brands under one system.
Restaurant Owners: Grow revenue with direct ordering and table reservations.
Caterers & Meal Preppers: Offer custom plans, schedules, and bulk delivery.
3. Must-Have Features in a Meal Delivery App in 2025
To succeed, your app must be more than just a menu. Modern users expect smart, seamless experiences. Here are essential features:
User Panel: Easy sign-up, browsing, ordering, reviews, and payments.
Admin Panel: Manage orders, menu, delivery, and analytics.
Delivery Partner App: Track routes, status updates, and earnings.
Real-Time Tracking: Build customer trust with live GPS tracking.
Meal Subscription Plans: Let users subscribe to weekly/monthly meals.
Push Notifications: Promote offers, reminders, and new dishes.
AI Recommendations: Suggest meals based on user preferences.
Multi-Payment Integration: Offer wallet, cards, UPI, PayPal, etc.
4. How to Build a Meal Delivery App: Step-by-Step
Thinking to create an app like UberEats or DoorDash? Here’s your roadmap:
Step 1: Define Your Business Model
Decide if you’re creating a single-vendor app (e.g., for your own kitchen) or a multi-vendor marketplace (like a food court).
Step 2: Choose the Right Development Partner
Look for a meal delivery app development company with experience in building scalable, secure, and user-friendly apps. Ventagenie specializes in creating custom meal, tiffin, and food delivery apps tailored for your niche.
Step 3: Select Features & Technology Stack
Your tech stack must support mobile (Android, iOS), GPS, real-time updates, and high traffic. Ventagenie ensures your app is performance-optimized from day one.
Step 4: Design UI/UX
The design must be intuitive and modern. 2025 users expect fluid navigation, voice search, and quick access.
Step 5: Develop, Test & Launch
A reliable development team will handle front-end, back-end, APIs, testing, and deployment. Once live, marketing support will boost visibility.
5. How a Meal App Directly Impacts Revenue
Let’s talk numbers. Here’s how a well-designed app increases revenue:
20-30% more repeat orders through personalized experiences.
25% higher average order value with cross-sell & upsell features.
30% boost in delivery efficiency via route optimization and auto-assignment.
60% savings on third-party app commissions.
When you build your own app, you own the customer journey—and the profits.
6. Subscription-Based Model: The 2025 Revenue Winner
Did you know?
Meal subscription models are growing at 13.3% CAGR globally.
Add daily/weekly/monthly plans to lock in recurring revenue. Ideal for tiffin services, fitness meal providers, and family meals.
7. Common Mistakes to Avoid
Ignoring user feedback
Poor UI/UX design
Choosing the wrong tech partner
Not planning for scalability
Ventagenie solves all these with end-to-end, scalable app solutions.
8. Why Choose Ventagenie meal delivery app Development Company?
As a leading meal delivery app development company, Ventagenie offers: Social Media Integration: Share reviews, images, and links for more engagement.
Custom white-label app development
Expertise in restaurant app development
Solutions for tiffin services, cloud kitchens, and more
Affordable pricing and scalable architecture
Whether you want to create an app like UberEats or DoorDash, or build a tiffin delivery app for your local area, Ventagenie tailors the solution to your exact needs.
9. Final Thoughts: Don’t Wait to Digitize
2025 is the year of digital-first dining. A mobile app is no longer a luxury—it’s a necessity. Whether you’re a food startup or a well-established brand, embracing meal app development will position your business for long-term success in an evolving market.
Ready to boost your food business revenue with a powerful app?
Let Ventagenie help you turn your idea into a full-featured, revenue-generating meal delivery platform.
Visit ventagenie.com and take the first step today!
#mealdeliveryappdevelopmentcompany#mealappdevelopment#tiffindeliveryapp#createtiffinserviceapp#buildmealdeliveryapp#createapplikeUberEats#createapplikedoordash#foodappdeveloper#foodmarketplaceapp#restaurantappdevelopment#fooddeliveryapp#delivery app solution#create grocery delivery app#create app like instakart#marketplaceapp#meal delivery app development company#create app like walmart#delivery app development#best quick commerce software#meal app development
0 notes
Text
How to Build a Food Delivery App Like Uber Eats: Step-by-Step Guide

The demand for convenient food delivery solutions has skyrocketed in this era of digitalization. Apps like Uber Eats have changed the method of ordering food by giving the customer a seamless experience-from searching through delivery. In this profitable industry, developing a profitable partner for the food delivery application could be a game-changer. Finally, Netscape Labs comes with an ultimate guide to the post-2025 Uber Eats App Development.
Why Invest in Food Delivery App Development in 2025?
Consumer behaviors and technological progress will see the food delivery market globally hitting an all-time high in 2025. With more individuals being dependent on mobile applications for all their everyday needs, food delivery app development can command a large user base. Whether you’re a startup founder, a business decision-maker, or a tech-savvy entrepreneur, now is the opportune moment to work with a mobile app development company to give life to your idea.
Essential Features for a Food Delivery App Like Uber Eats
For Your Users
An app that has a fast, no-fuss login with an OTP or one-tap Google/Apple sign-ins. Then comes the main dish: restaurant listings that don’t overwhelm, but give just enough detail (cuisine, reviews, delivery time filters) to help users decide in seconds. Live order tracking has become non-negotiable, and don’t forget payment flexibility, cards, wallets, and even UPI. Wrap it all up with a solid rating/review system. People love being heard.
For Your Restaurant Partners
They need control over menus, pricing, availability, and a dashboard that doesn’t require a manual to use. Throw in real-time order management and basic sales analytics, and you’ve got a system that helps them operate smoothly and stay loyal to your platform.
For Your Delivery Partners
Notifications need to be real-time and reliable. Help them with route suggestions, allow them to track their earnings transparently, and make the experience frictionless. The smoother it is, the faster the deliveries.
For You, the Admin
You should have visibility over every moving part: users, restaurants, delivery crew, commissions, offers, and reports. Your dashboard is your control tower. Use it to run campaigns, resolve issues, tweak pricing, and most importantly, make data-backed decisions.
Standout Features That Make Users Stick Around
AI recommendations: People love it when the app seems to “know” what they’re in the mood for. Use behavior-based suggestions.
Voice search: It’s faster than typing, and great for accessibility.
Loyalty rewards: Offer cashback, points, or discounts to keep users coming back.
Multi-language UI: Don’t assume your audience speaks English. Offer local language support.
Contactless delivery: It’s no longer just a pandemic feature; it’s now a convenience.
What’s Under the Hood: Tech Stack You Can Trust
For cross-platform mobile apps (iOS + Android with one codebase), we recommend Flutter or React Native, both reliable and fast-moving.
On the backend, Node.js or Django gets the job done well, depending on your team’s strengths. For databases, go with MongoDB for flexibility and PostgreSQL for structure.
Add Stripe or Razorpay for secure payments. Use Firebase Cloud Messaging for real-time order updates. And for maps and tracking, Google Maps API is still the gold standard.
Also Read- Gemini’s Multimodal Capabilities: A New Era for App Development
Why Choose Netscape Labs for Your Food Delivery App Development?
Specializing in custom mobile solutions at Netscape Labs, we design and develop mobile applications tailored to your businesses. Being an excellent mobile app development company having its establishments in Singapore, Canada, Malaysia, and Dubai, we have reservoirs of experience.
Our team of mobile app developers can create high-quality, scalable, and user-friendly applications. Perhaps, if you’re a startup looking to disrupt the food delivery industry or an established corporation with plans to expand its digital presence, Netscape Labs is your trusted partner in mobile app development.
Conclusion
Building a food delivery app like Uber Eats in 2025 presents a significant opportunity to tap into a growing market. By incorporating essential and advanced features, selecting the right technology stack, and partnering with an experienced mobile app development company, you can create a platform that meets user expectations and drives business growth.
Ready to embark on your food delivery app development journey? Contact Netscape Labs today to turn your vision into reality.
FAQs
Do we need separate apps for users, restaurants, and delivery partners?
Yes. A scalable food delivery platform typically includes three modules (User App, Restaurant Dashboard, and Delivery Partner App), plus a robust Admin Panel. A seasoned app development company will help you architect this with clean APIs and a unified backend.
We are based outside the US. Can we are still build a competitive food delivery app?
Absolutely. Whether you’re looking for a mobile app development company in Singapore, mobile app developers in Canada, or expertise in mobile app development in Malaysia, location is no barrier to innovation. Netscape Labs has helped global clients launch cross-border delivery apps with local flair and global standards.
How is a food delivery app different from other e-commerce apps?
Unlike regular e-commerce, food delivery apps need real-time inventory sync, live location tracking, ETA management, and instant notifications. This adds complexity, so you need a best app development company that gets the nuance of real-time logistics.
Can we add AI features to my food delivery app?
Definitely. From smart dish recommendations to dynamic delivery estimates, AI in mobile app development can supercharge user engagement and operational efficiency. Our team bakes intelligent features right into your stack.
How long does it take to launch a food delivery app?
With the right tech partner, you can launch a functional MVP in 8–12 weeks. Full feature development might take 4–6 months. As a mobile app development company, we prioritize agile sprints and weekly check-ins to keep you moving fast without surprises.
What makes Netscape Labs different?
We don’t just write code, we build businesses. Our team has worked with startups and enterprises worldwide to deliver digital products that scale. If you’re looking for the best app development company to create a food delivery app like Uber Eats, look no further.
#app developers#app developing company#app development#app development company#app development company in chandigarh#app development company in mohali#Food Delivery App#Food Delivery App Development#Food Delivery App Like Uber Eats
1 note
·
View note
Text
The Future of Mobile Applications: How Technology is Transforming the Way We Interact
Every e-commerce person needs to know how to build pages with WP bakery page builder. This theme provides support for the Visual Composer plugin as well as a custom-made plugin named “Visual Composer Extension” for our customers. The Visual Composer plugin and extension adds a range of drag-and-drop plugins to your dashboard, allowing you to create your site quickly and easily. This theme provides support for the Visual Composer plugin as well as a custom-built plugin named “Visual Composer Extension” for our customers.
The Visual Composer plugin and extension adds a plethora of drag-and-drop plugins to your dashboard, allowing you to create your site quickly and easily. Creating pages for your WordPress platform is also as simple as a few clicks and drag-and-drop operations with WPBakery Page Builder‘s elaborate but intuitive front-end and back-end editors. I’ll teach you how to add WPBakery Page Builder to your WordPress installation and walk you through all of the key features in this Visual Composer guide.
Requirements for WP Bakery Page Builder
You’ll need the following items to follow along with this WPBakery Page Builder tutorial:
WordPress 5.0 or higher is essential.
a subscription to Envato
In addition, I recommend reading the following article to better understand how to use Visual Composer and why you should use WPBakery Page Builder instead of any of the other page-builder plugins available today:
WPBakery Page Builder Installation
WPBakery Page Builder is a WordPress premium plugin. It’s available on Code Canyon, so sign up with your Envato account and buy a license. It’s still commonly is in reference as Visual Composer. Once you’ve paid for it, you’ll be able to download a ZIP file containing various plugin data.
Look for a file called js composer.zip after extracting the ZIP file. This is a WordPress plugin archive file that you must add to your server. So, go to Plugins > Add New in your WordPress admin line. Then pick js composer.zip from the Upload Plugin drop-down menu. To begin the update, click the Install Now button. When the installation is over, click the Enable Plugin button. You’ll be guided to the WPBakery Page Builder welcoming screen as soon as you do so.
Make Sure WPBakery Page Builder Plugin Is Installed & Active
Make sure the WPBakery Page Builder plugin is turned on. Since this plugin is not included with the theme (for good reason), it must be installed and allowed as described in the “Installing Recommended Plugins” guide. You should have been asked to install the recommended plugins after downloading the theme. Now is the time to install the Visual Composer if you haven’t already.
Configuring the WP Bakery Page Builder Plugin
It’s easy to learn how to use WPBakery Page Builder. The plugin is highly customizable, with hundreds of configuration choices to tailor it to your specific needs. To see them, press the Settings button on the welcome pad.
WP Bakery Page Builder with general settings
The plugin comes with a well-thought-out default setup that will suffice for the majority of use cases. For example, you can see that it supports responsive design right out of the box in the General Settings tab. The plugin also attempts to add different optimizations so that the pages you generate with it load quickly. For example, it defaults to using only the Latin script subset of Google fonts. All you have to do is change the Google fonts subsets option to accept other scripts.
You’ll note that this plugin is only available for your WordPress site’s pages in the Role Manager tab. Select Custom in the Post styles list and allow the post feature if you want it to be eligible for your posts as well.
Configuring post types:
Scroll down and press the Save Changes button once you’ve made the changes.
Finally, go to the Template Options tab and search the Use custom design area if you want to configure the look and feel of WPBakery Page Builder’s content elements. You’ll be able to adjust the plugin’s pre-set colors, margins, and widths after you’ve done so.
Define Main Settings for WP Bakery Page Builder
To configure the plugin, go to Settings > WPBakery Page Builder. The most crucial step is to turn on the composer for the post forms you choose to use it for. This is achieved through the “Role Manager” tab and the “Post Types” options. You can make the page builder accessible based on the user function, but you’ll really just want to change the “Administrator” settings.
Using the WP Bakery Page Builder Plugin
The Visual Composer is really simple and doesn’t need much explanation; for a short guide, see the screenshots below (you can also check out this more detailed Visual Composer guide). To begin, choose if you want to use the Backend or Frontend editor and press the appropriate button.
The Visual Composer Backend Editor
In this Visual Composer tutorial, this is a crucial step. There are two powerful editors included with WPBakery Page Builder: a back-end editor and a front-end editor. They can only be accessed from inside a website or a tweet. As a result, I recommend that you make a new page by heading to Pages > Add New for the time being. You can select which editor you want to use in the page construction GUI. To open the backend editor, first press the Backend Editor button.
You can conveniently connect a number of widely used elements to the website using this editor. Simple elements including text blocks, pictures, and separators are available in WPBakery Page Builder. Advanced features include Facebook “Like” icons, Google Maps, charts, and animated carousels. The components are grouped into four groups for easy access: text, social, structure, and WordPress widgets.
The elements that are available are listed below:
Content elements, as the name implies, are elements that are often used to construct the contents of a blog or an article. Social features, on the other hand, are ones that make it simple for people to share your profile on social media sites. Structure components, on the other hand, are intended for more experienced users who are familiar with writing code. They allow you to add raw HTML and JavaScript to your website directly.
To add an element, simply click the Add Element button and choose the desired element. Alternatively, you should use the Add Text Block button to add text to the website directly.
Text editor
If you don’t like the way an aspect looks by default, you can always change its styles by going to the Design Options page. Once you’ve added a few items, you’ll find that each one has a toolbar with a few buttons associated with it. These buttons show intuitive icons and enable you to perform essential operations like dragging and dropping an entity to alter its position, duplicating, removing, or editing its contents.
Keep in mind to save your page once you’ve finished adding components.
The Visual Composer Frontend Editor
The frontend Visual Composer has the same page building choices as the backend Visual Composer. The main distinction is that instead of position holders, you will see the individual page elements when you insert theme.
Using the WYSIWYG Front-End Editor
The back-end editor is perfect for pages with a number of elements that are lengthy and complicated. You get to deal on the final presentation of your website right from the start if you use the WYSIWYG front-end editor instead. You can swap between editors at any time, so scroll up and click the Frontend Editor button to launch the latest one.
Frontend Editor
Only when you mouse over a feature in this editor can you see the toolbars associated with it. Toolbars and the features they provide are somewhat close to those provided by the back-end editor in frontend editors demo options. You will now see how the website appears on different screen sizes using the front-end editor. You can also continue editing the page in whatever screen size you choose.
Using Templates
Using models is another critical part of learning how to use WPBakery Page Builder. Any page or post you make with WPBakery Page Builder can be turned into a prototype. You will reduce the amount of tedious work you do when making pages for your WordPress site by using this feature.
Open the Templates dialogue, assign the template a tag, and click the Save Template button to save the new layout of your page as a template.
Save the template in the Save Template dialogue box
Working with your own models isn’t the only choice. This plugin has a huge template library that is maintained on a daily basis. Switch to the Template Library tab and hit the Access Library button to access the library. In the template library, you’ll find that the library has a large number of high-quality layout models. You will do any of them for free. However, before you can use them, you must first unlock your WPBakery Page Builder certificate.
0 notes
Text
New bug fixes and features - April 2025
New Features
UI
Introduced a Glimmer component for managing pipeline secrets in the new UI to enhance user experience and functionality. See PR.
Introduced a new Glimmer component to manage API tokens, allowing users to create and manage them more efficiently. See PR.
PR Desync: a feature in the UI to detect and notify users of desynced pull requests in the database due to prolonged pipeline inactivity, providing a convenient resync button. See PR.
Support for reverting overridden secrets and improved ambiguity in secret deletion messaging in the new UI. See PR.
Introduced a new navigation bar for switching between secrets and tokens in the new UI. See PR.
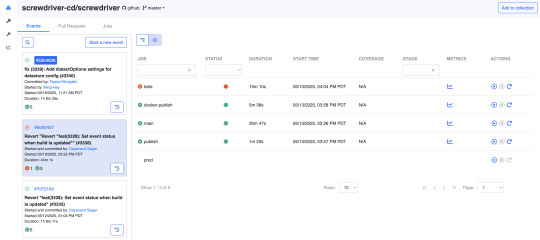
Default status sorting added to the event jobs table, with sorting based on build color and then alphabetically by stage and job name. As depicted below, the failed build is sorted at the top. See PR.
API
Added feature to trigger jobs when a pull_request closed webhook event is received in Screwdriver. See PR and guide.
Added feature to set event status when a build is updated, tracking overall execution status for an event. See PR.
Added a DELETING state to the pipeline to prevent updates during pipeline deletion, addressing remaining pipeline data post-deletion issue. See PR.
Implemented a feature flag to control log payload logging, aiding log volume management. See PR.
Pipeline admin user list now updated based on SD user permissions table. See PR.
Bug Fixes
UI
Implemented a fix to allow navbar to be displayed when the hamburger menu is expanded on small devices. See PR.
Fixes issues with edit secret modal in new landing page by setting secret value properly for API request and returning full response when “allow in pr” field is changed. See PR.
Ensures that the workflow graph maintains the toggle state of downstream triggers when switching between different pipeline events. See PR.
Event rail reloading logic in the new pipeline landing page was adjusted to align with the vertical collection component. See PR.
Fixes an issue where cacheKey was incorrectly removed during data reloading in the pipeline workflow, ensuring the latest commit SHA is correctly reset. See PR.
Pipeline header updating issue resolved by adding necessary tracking to update properly when a pipeline changes. See PR.
Pipeline root directory now included and displayed alongside branch name in new UI. See PR.
API
Added a check for adminUserIds for backward compatibility in situations where old pipelines have a null adminUserIds column due to inability of MySQL 5 version to set default values in TEXT fields. See PR.
Fix for triggering the next build on the child event when some builds are restarted before all builds are completed. See PR.
Compatibility List
In order to have these improvements, you will need these minimum versions:
API - v8.0.26
UI - v1.0.1272
Store - v7.0.0
Queue-Service - v5.0.1
Launcher - v6.0.221
Build Cluster Worker - v5.0.1
Contributors
Thanks to the following contributors for making this feature possible.
Akinori
Keisuke
Ming
Pritam
Sagar
Vonny
Yuki
Yuta
Jithin
Questions and Suggestions
We’d love to hear from you. If you have any questions, please feel free to reach out here. You can also visit us on Github and Slack.
Author
Vonny Jap, Senior Manager, Software Dev Engineering, Yahoo
0 notes